Monday, November 30, 2015

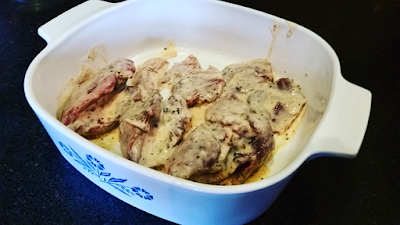
Smothered Pheasant In the Dutch Oven - Recipe

By Andrea Haas


Sorry I didn't take better pictures while making this recipe. It was kind of an experiment, but it turned out to be one of my favorite ways to make pheasants. 
The original recipe I found on www.allrecipes.com, titled Smothered Pheasant. I used that recipe and added my own twist to it by adding different spices & seasonings. I also added the chopped green chiles, which I feel really made the recipe. You could also use mushrooms instead. Either way would be great! 
The original recipe calls for 6 pheasant breasts and 2 cups of half and half. I only used 3 breasts and I thought the 2 cups half and half was perfect for that amount. 

Ingredients

-6 skinless, boneless pheasant breast halves
-garlic salt and black pepper, to taste
-1/2 cup all-purpose flour
-1/2 cup butter
-2 cups half and half cream

Directions

-Preheat the oven to 325 degrees

-Add flour to a plate or bowl and mix in garlic salt and black pepper.I was pretty generous with the garlic salt. Press the pheasant breast into the flour until completely coated. Shake off excess flour and set aside.

-Melt the butter in a cast iron Dutch Oven over medium heat. Cook the pheasants in the hot butter until golden brown on both sides, about 5 minutes per side. Careful not to overcook.

-Pour in the half and half and bring to a simmer. Add chopped green chiles.

-Cover the Dutch Oven and bake in the preheated oven until pheasant breasts are tender and no longer pink, about 1 1/2 hours. I baked my 3 breasts for just an hour and they were done. 


Tuesday, November 17, 2015

Tips For Air Travel - Part 2

Tips for Air Travel (Part 2) – Finding Flight Pitfalls – The Carry-On Conundrum

By Lora Gene Young


Your mother always said; make sure you have extra clean underwear in your carry on. Though that is still true, there are a few other things you should consider in when packing your luggage before a hunting trip.
  1. Your carry on. Yes, clean underwear is a must! But you should also consider what you will need if your luggage gets delayed and you have to hunt before your luggage is returned. First, your spare change of clothes. Most people pack a spare change of clothes in their carry on. If you are hunting, this spare change of clothes should be your most compact set of hunting clothes. Clothes are not the only important hunting gear you should pack in your carry on. Optics are a carry on must! If your checked bag or gun case is lost, chances are your outfitter will have a spare gun for you to use until yours arrives. The outfitter might also have some spare clothes you can borrow, but good spare optics… Make sure you pack your binoculars and your range finder in your carry on luggage. 
  2. Your checked bag. If you have a spare set of hunting clothes and your optics in your carry on luggage, the next step is packing your checked bag. Remember, all knives must be checked. Also, your ammunition must go in your checked bag. Ammunition cannot be transported in the gun case. Make sure you check ammunition regulations for your hunting location before you leave. Many countries have limits on amounts, calibers, and variety.
  3. Your gun case. If you are taking your own gun make sure your gun case meets regulations. It must be a hard case with locks. Your gun should be stored with bolt out. Remember, no ammunition in your gun case. Knives could be transported in here if you need extra room in your checked bag, but I do not suggest putting your optics in your gun case. If this is delays in transportation you are stuck without a gun or optics. No a good way to start a hunting trip of a lifetime.

Lost luggage is a headache, especially in a foreign country, but proper packing of your carry on can make it less of an ordeal. International travel is always accompanied with delays and hiccups, but airline troubles should not dampen your hunting experience. Hopefully these tips will ease your travelling woes and lead to a successful and carefree hunt.


Tuesday, November 10, 2015

Heritage 1865 - Hunting Outfitters and Lodge Review

By Andrea Haas


If you're looking for a great place to hunt upland birds, turkeys, or whitetail in Iowa, Heritage 1865 is the place to go! My husband and I went on an upland bird hunt there in October and were extremely impressed, not only with the hunting guides and the amount of shot opportunities at birds, but the amenities available at the lodge and the warm, friendly atmosphere as well.

Heritage 1865 is a family owned and run outfitter in south central Iowa, near Promise City. The lodge sits on 6,500 acres of prime hunting ground that is abundant with wildlife and has been managed to provide the best habitat for pheasant and quail. It's in Zone 5, which has been known to produce Pope and Young quality bucks and record-breaking eastern turkeys as well. 

The Heritage property is owned by the Ewing family and has been in their family for 150 years, passed down from one Ewing generation to the next since 1865. When we arrived at the lodge we were greeted by the owner, Travis Ewing and his grandmother Judy and could smell dinner cooking on the stove! Grandma Judy made us home cooked meals and desserts each day that were honestly the best we've ever had. We felt right at home and were treated like family!


Our guide, Tad, was very knowledgeable and familiar with the land. His hunting dogs Diesel, Hammer, and Dale didn't disappoint us either! This was our first time hunting with dogs, but it was clear that they knew what they were doing and were very well trained. We got multiple shot opportunities at quail and pheasants and the dogs were able to find and retrieve each bird that we shot.


I could not have asked for a better experience than at Heritage 1865. My pictures and review just do not do this place justice! Please check out the video on their website to see more, or better yet, book the lodge to see for yourself! The rates are all very affordable and there is a good variety of hunting packages available to best suit your needs.


Visit their website (www.heritage1865.com) for more information and to read up on some of the interesting Ewing family history that truly makes this place one of a kind! My husband and I look forward to returning there year after year to hunt and to visit with the family!


Tuesday, November 3, 2015

Buttermilk Fried Quail Recipe

By Andrea Haas


This October I went on my very first quail hunt. We ended up with 12 total, just enough for a meal! I've never had quail before so I experimented with it and tried it a couple of different ways to see how I like it. The recipe is intended for the whole quail breast, but we cut the meat off of the bone on a few and fried them that way, similar to nuggets. I personally preferred it that way, my husband liked it left on the bone (which is definitely easier and quicker). If you decide to make these into nuggets, use less oil and don't fry them as long. Once they are floating in the oil & golden brown, they are done.


Ingredients

-8 to 16 quail breasts
-2 cups buttermilk
-2 Tablespoons Italian Seasoning
-2 teaspoons paprika
-1 Tablespoon garlic powder
-1 teaspoon ground white pepper
-2 cups flour
-1 Tablespoon salt
-3 cups vegetable oil

Instructions

Mix the buttermilk with all of the spices (except the salt). Dip the quail in the mixture and then set in a covered container for 1-8 hours.


When you are ready to fry, pour the oil in a large pan - I prefer a 10" cast iron pan - and heat over medium-high heat. You'll want enough oil so that it almost submerges the quail breasts.

Meanwhile, take the quail out of the buttermilk and let it drain in a colander. Don't shake the colander, just set the quail in it and leave it there.


Test the oil temperature by sprinkling a little flour into it. When it's ready, the flour will immediately sizzle.

Pour the flour and salt into a plastic baggie and shake to combine. Put a few of the quail into the bag and shake to get it coated in flour. Fry for about 4 to 5 minutes on one side. Turn the quail over and fry for another 3 to 4 minutes. You will probably fry in batches, so leave the unfried quail in the colander until you're ready to coat them in flour and fry them. You don't want the floured pieces to sit and soak up the flour.


When the quail are fried, set them on a cooling rack set above paper towels to drain away excess oil. 

Here's the finished product! It would go perfect with biscuits & gravy!